Saturday, May 5, 2018

Basketweave Meringues with Freeze Dried Raspberries & Peaches


Hi sweet followers!! Hope your weekend is going well! I've
been in the kitchen baking meringues today! I thought it
would be fun to use my basketweave tip to pipe out some
meringues that I flavored with freeze dried raspberries
and peaches! They turned out really cute!!

I made 2 batches of basic brown sugar meringues recipe, then
added one package of freeze dried raspberries to one batch and
one package of freeze dried peaches to the other batch. The 
raspberry meringues had fantastic flavor and color. The peach 
meringues were yummy too, but the package was smaller than the 
raspberries so there wasn't quite as much flavor. I also added a 
bit of food coloring to create a peach color.

I used Ateco tip #898 to pipe the meringues. Just make sure to 
hold the piping bag so that the "teeth" are on top (as shown
above) while piping. I piped my meringues about 2 1/2" long,
then baked them at 225F for 2 hours.

These meringues are just delicious!! They stay nice and 
crisp in an airtight container for at least a week, probably 
longer!

The meringues are fantastic alone, but add whipped
cream and berries and they are superb!!  

For the filling I wanted something other than simply
whipped cream, so I tried adding cream cheese to the heavy 
cream, then I tried mascarpone and heavy cream. I liked the 
mascarpone best because it produced a silky filling and 
was easier to pipe. Then I added a bit of pink natural food 
coloring that I just discovered and I really liked the color.


RASPBERRY & PEACH MERINGUES

Ingredients for 1 Batch:

4 large egg whites (room temp)
1 cup light brown sugar
1/4 teaspoon cream of tartar
1/4 teaspoon salt
freeze dried raspberries or
freeze dried peaches 

For the filling:

1 cup heavy Cream
1/4 cup mascarpone 
1/4 cup powdered sugar, sifted
1/8 teaspoon McCormick "Berry" 
powdered food coloring (or you can
just add your own pink food coloring)

Directions:

Preheat oven to 225 degrees F. and line
2 baking sheets with parchment paper.
Process desired freeze dried fruit in a 
food processor. Use a fine mesh sifter to 
strain out any seeds.

In the bowl of a mixer fitted with a whisk
attachment beat egg whites until foamy
(about 30 seconds), add cream of tartar and 
salt and beat until meringue forms soft peaks.
Add brown sugar 2 tablespoons at a time until 
incorporated.  Add freeze dried fruit (and food 
coloring now, if desired.) Turn mixer to high and 
whip mixture to stiff peaks. 

Spoon mixture into a piping bag fitted with
a basketweave tip. (I used Ateco tip #898)
Pipe meringues about 2 1/2 inches long spacing 
them 1 inch apart.  Bake for one hour, then 
rotate the baking sheets and continue to bake
for one more hour. I left my meringues in the
oven for another 30 minutes after turning the
oven off. Remove from oven, let cool on baking 
sheet, then immediately place in an airtight 
container. Makes 3 dozen meringues.

To make Meringue Stacks:

Beat together filling ingredients to stiff peaks,
then fill a piping bag fitted with an open star tip
with some of the filling. Place 3 meringues side by 
side on a baking sheet, ridges side up. Begin 
piping the filling on one meringue moving
 from side to side until cookie is covered with 
filling. Next, pipe filling on second meringue and 
gently place on top of the first. Top with the third 
meringue. Pipe a small swirl of filling on top and 
add a small sugar flower or an edible flower if 
desired. Keep repeating this process until all 
meringues are used. Place on a pretty 
cake stand and serve immediately.

I also made these using Ateco tip #846.
So cute!!
Happy Baking!!


Wednesday, April 4, 2018

French Vanilla Cake Mix Cookies with Buttercream & Sprinkles


If you're looking for a yummy cookie recipe that you can whip
up at a moment's notice for a birthday, bake sale, or shower
then look no further! I have an easy, pretty, Springtime cake
mix cookie to share with you!

Cake mix cookies are fast and convenient when you're
short on time! We've all been there!! What makes these
 cookies so pretty is the addition of pastel buttercream and 
sprinkles! Gives them a cheerful springtime look!


There are a variety of ways that you can serve these cookies
to suit your type of function. For a shower they can be served 
as mini cookies with a pretty swirl of buttercream on top; for a 
birthday party you can just serve them with sprinkles on top. For 
a bake sale, you can swirl some buttercream between two 
cookies then place in clear bags tied with a pretty ribbon.

Using a piping bag to frost the cookies makes them look 
so pretty and it really isn't difficult to learn! I used a 
Wilton 1M (open star) piping tip for the pink rose swirl 
and a Wilton 2D (closed star) piping tip for the yellow 
swirl. Both tips will make similar designs; the 2D is 
slightly more ruffly. 

To pipe the rose design, begin piping in the center of
the cookie and pipe around and around to end at the 
edge. (See a video here.)

To create a different design, start piping on the outside 
edge and swirl around and around to end in the center.

After piping the buttercream, you can top with a second cookie
and sprinkle with a bit of powdered sugar if you like.


FRENCH VANILLA CAKE MIX COOKIES
adapted from here

Ingredients: 

1 box French Vanilla Cake Mix (Duncan Hines)
(If you can't find French Vanilla, use Classic White)
1 teaspoon baking powder
2 large eggs, lightly beaten
1/3 cup vegetable or canola oil
1 teaspoon pure vanilla extract
1/4 cup sprinkles or nonpareils

Buttercream:

2 sticks unsalted butter, softened 
(I used salted because that's what I had)
3 1/4 cups confectioners' sugar, sifted
(plus 1/4 cup to top)
1 1/2 teaspoons clear vanilla extract 
(this helps maintain the bright white color)
2-3 tablespoons heavy cream or milk
food coloring of choice
2 disposable piping bags
Wilton piping tip 2D or 1M

sprinkles or nonpareils for topping

DIRECTIONS:

Preheat oven to 350º F. Line a rimmed
baking sheet with parchment paper or
a nonstick baking mat.

In a large bowl whisk together cake mix &
baking powder. Using an electric mixer, beat in
eggs one at a time, oil and vanilla. Mix until
thoroughly distributed into the batter.

Shape dough into 1-inch balls (I used my small 
cookie scoop), placing them 2 inches apart on 
parchment lined baking sheets. With bottom 
of a glass dipped in powdered sugar, flatten to 
1/4" thickness. Sprinkle cookies with pastel 
sprinkles if desired.

Bake in preheated oven for 10 minutes.
Let cookies cool on baking sheet, then 
remove to a wire rack to cool completely.

For the Buttercream:

In the bowl of a stand mixer, cream butter for 
5 minutes. With mixer on low speed slowly add 
the confectioners' sugar and beat until well blended.
Add vanilla and 2 tablespoons of heavy cream or milk 
and mix until incorporated. Add an additional 1-3 
tablespoons of heavy cream or milk until you reach the 
desired consistency. Beat at high speed until frosting is 
smooth and fluffy; about 5 more minutes. Add food 
coloring until you get desired color. I divided buttercream
in half, then colored each.

Pipe frosting onto cooled cookies and top with pastel
sprinkles if desired. Store cookies in an airtight 
container in the refrigerator for up to 3 days.
Yields approximately 40 cookies or 20 cookie
sandwiches.


Hope this gives you some ideas the next time you need
a quick dessert!! 


Tuesday, March 27, 2018

Vanilla Bean Bunny Panna Cotta for a Spring Tea

Last year I came across a set of vintage bunny molds and
I couldn't wait for Spring so that I could share them on the
blog! The only question was, what dessert to use with them?!
I had but one thought...Panna Cotta

Have you tried Panna Cotta? It's a creamy, silky custard-like 
Italian dessert that's very easy to make and can be made in 
advance.  It's a molded dessert and can be served in teacups, 
pretty glasses, or any other individual serving dishes that you 
have. It's wonderful served with fresh fruit, especially berries!

These panna cotta are so easy and only take minutes to
prepare! The hard part is waiting for them to set in the
refrigerator! But it's a great make ahead dessert, and 
so delicious! They look so impressive that your guests
will think you spent all day on them! (We won't tell!!)
To make the bunny detail stand out, I removed a tablespoon or 
so (per mold) of the mixture and mixed it with some pink food 
coloring. I poured this mixture into the bunny part of the mold
and let it set before adding the rest of the mixture.

I used vanilla bean paste instead of extract because of it's
wonderful flavor and because I love to see the pretty specks 
in the panna cotta.


VANILLA BEAN PANNA COTTA
adapted from here

Ingredients:

Cooking Spray
1 1/2 cups whole milk
3 teaspoons powdered gelatin
1/3 cup sugar
1 1/2 cups heavy cream
2 teaspoons vanilla bean paste (or extract)
pinch salt

Instructions:

Lightly grease 6 4-ounce ramekins. Wipe most
of this out leaving just a light coating. Place them on a 
baking sheet. Pour the milk into a saucepan and sprinkle 
the powdered gelatin evenly over top. Let soften for 5 minutes 
or until the surface of the milk is wrinkled and the gelatin grains
 look wet and slightly dissolved. Set saucepan over low heat 
and warm the milk gently, stirring often. (Do not boil) 

After about 2 minutes of warming, rub a bit of the milk
between your fingers to make sure it's smooth and the grains 
of gelatin are dissolved. Stir the sugar into the milk and continue 
warming until it dissolves. It shouldn't take more than 5 minutes
total to dissolve both the gelatin and sugar. Remove the saucepan 
from the heat and whisk in the cream, vanilla and salt.

Pour mixture through a mesh strainer into ramekins, teacups or 
molds and place in the refrigerator (loosely covered with foil) 
to chill. If serving straight from the cups, without unmolding, 
chill for 1 to 2 hours. If unmolding the panna cotta, chill for at 
least 4 hours or overnight. To unmold, pour some warm to hot 
water partway into a large bowl. **To prepare the dessert plates, 
wipe them with a damp paper towel first because that will allow 
you to reposition the panna cotta more easily if it doesn't fall in
 the right spot. (Mine never did!)

Run a thin knife carefully around the sides of the ramekin. Don't
slide the knife all the way into the cup; just release the top edge of 
the pudding from the edge of the cup. Dip the ramekin in the warm 
water up to its rim and hold it there for about 3 seconds. Wipe the 
bottom of the ramekin with a cloth then invert the ramekin over the 
plate and shake gently. It should fall out on the plate easily. (If it 
doesn't, return to the warm water bath in increments of 2 seconds.) 
Reposition on the plate if necessary. Serve immediately, or refrigerate, 
lightly covered, for up to 5 days. Serve with fresh fruit and/or fruit 
sauce if desired. Makes 6 4-oz puddings.


Another delicious and easy teatime recipe from me to you!
enjoy!!


Tuesday, March 20, 2018

Madeleine inspired Melting Moments


I have an easy, elegant and scrumptious little cookie
to share with you today! It's a Melting Moments cookie baked 
in a mini Madeleine pan! I used the same recipe as my Melting 
time I pressed pieces of the dough into my French Madeleine 
pan, baked them, then sprinkled them with powdered
sugar to serve. 

I used this same technique for my Orange Shortbread Madeleines.
I really liked the way this pan showed off the lovely details of the 
Melting Moments cookies. I used a darker non-stick pan for the 
orange shortbread madeleines and they weren't as pretty.

I didn't even have to butter the pan before baking. Then I 
let them cool for 3 or 4 minutes, gently tapped the pan 
on the counter and they fell right out.

I let them cool completely on a wire rack, and dusted them
with a light sprinkling of powdered sugar. How easy is that?!

I think these are a perfect easy addition to a 
Spring Tea Party menu! 


Madeleine inspired MELTING MOMENTS 


2 sticks (250g) butter, softened
1 teaspoon vanilla extract (I used clear)
1/2 cup (80g) icing (confectioners') sugar, sifted
1 1/2 cups (225g) all purpose flour
1/2 cup (75g) cornstarch (cornflour)

Preheat oven to 325F (160C).
Line baking sheets with parchment paper.
Into a bowl, sift together the all purpose flour
and the cornstarch/cornflour. 

Beat butter, extract and confectioners' sugar
with an electric mixer until light and fluffy.
On lowest speed, add flour mixture in two
batches.

Divide dough into quarters. Onto a surface dusted with 
a light coating of powdered sugar, Roll each quarter into 
a log about 9"-10" long and 1 1/4" round. Slice each log 
into 1/2 inch wide slices and press each piece into a 
Non-stick Mini Madeleine pan. Bake for about 15 
minutes. 

Let cool in pan for 3-4 minutes. Remove cookies from 
pan by gently tapping on work surface, then transfer 
them to wire rack to cool completely. Makes 
approximately 80 tiny cookies.

To serve: Lightly dust cookies with powdered sugar
then arrange on a vintage plate. Place a few
edible flowers around for an extra pretty
touch! Enjoy!


Today I'd like to sit and sip
Forget about the world a bit,
Ignore the things I have to do,
         And just enjoy a cup or two. - Unknown


Tuesday, March 13, 2018

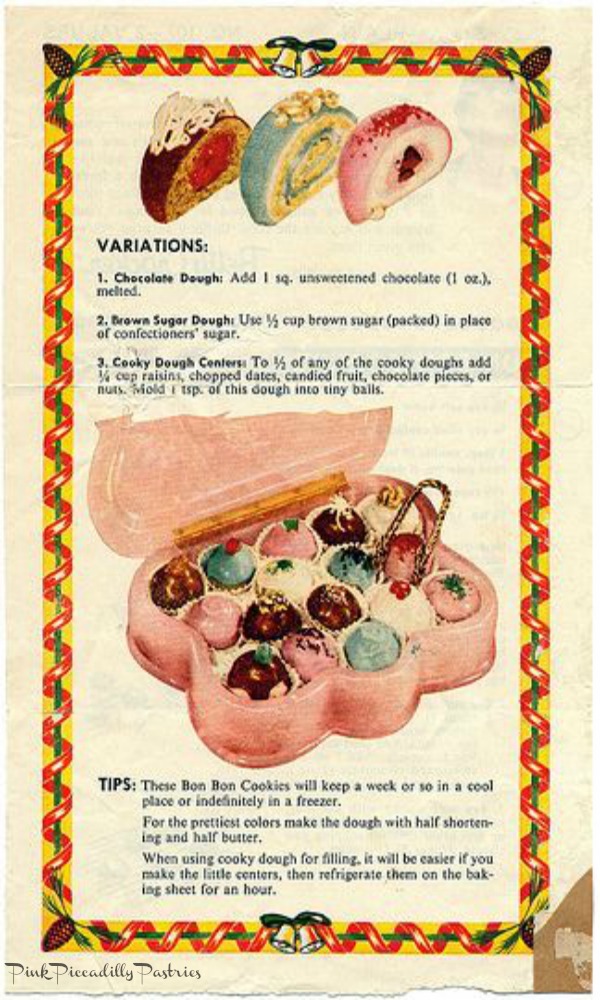
BONBON Cookies - The Best Cookie of 1955-60


Today I'd like to share a really fun cookie that was all
the rage between 1955-60.  The BONBON Cookie - a
delightful little cookie that was baked with a candy
surprise in the middle, decorated, then served and 
eaten as you would a special box of chocolates!

Here's what Betty Crocker says about them in her

"CANDY - LIKE COOKIES IN VOGUE - Women were
fascinated by these beautiful and delicious cookies which
were baked as cookies, served and eaten as candies."

These little gems are really easy to put together, but I 
highly recommend that you get a small ice cream scoop to 
make these. It guarantees even scoops which gives you a 
very pretty presentation. It also makes things a lot 
easier and faster because the scoop does the shaping
for you. 

After shaping the dough around your filling, pop
 them onto a baking sheet lined with parchment paper
and bake for 15 minutes. Dip tops into prepared icing 
and decorate with small candies, pieces of glace' 
cherries nuts etc.


"FASCINATING NEW BAKING IDEA"

"SO SIMPLE! SO DIFFERENT!
BAKE THEM AS COOKIES!
EAT THEM AS CANDIES!"


BONBON COOKIES

Ingredients:

1/2 cup butter, softened
3/4 cup sifted confectioners' sugar
1 tablespoon vanilla extract
1 1/2 cups sifted all purpose flour
1/8 teaspoon salt

Icing:

1 cup sifted confectioners' sugar
2 tablespoons cream (half & half)
1 teaspoon vanilla extract
food coloring of choice 

Directions:

Heat oven to 350º.  In the bowl of a mixer combine butter, 
sugar, vanilla, and food coloring. (if you want to make 
several colors from one recipe you would divide the 
mixture into separate bowls and tint each with your
choice of color.) 

Wrap a level tablespoon of dough around your chosen
filing or using a small ice cream/cookie scoop, fill with
dough then insert filling into center of dough and with
your fingers, press some of the dough around filling
to enclose.

Bake 1" apart on a parchment lined baking sheet 15 
minutes until set but not brown.

Dip tops of warm cookies in icing.
Top each cookie with coconut, nuts, colored sugar,
chocolate pieces or any other colorful topping you
choose.

Variations:

1. Chocolate Dough: add one square unsweetened
chocolate (1oz) melted.

2. Brown Sugar Dough: 1/2 cup brown sugar (packed)
in place of confectioners' sugar.


TIPS:

"THESE BON BON COOKIES WILL KEEP A WEEK OR SO
IN A COOL PLACE OR INDEFINITELY IN A FREEZER."

"FOR THE PRETTIEST COLORS MAKE THE DOUGH WITH
HALF SHORTENING AND HALF BUTTER."


I made these two separate times. The first time I made 2 
batches - one using the chocolate variation inserting some 
chocolate chips into the center. The other batch I tinted pink,
 inserting a macadamia nut into the centers.

 The second time, I tried to create a more vintage look,
like those in the book.


These Bonbon Cookies are easy petits fours for a ladies' 
tea party! Serve them in mini cupcake liners for a fancy 
presentation. Just choose your colors and toppings - the
possibilities are endless! 

Happy Baking!!


Friday, March 9, 2018

Vanilla Shortbread Butterflies for Spring Gifting


I usually don't repeat a recipe but I wanted to share with
you these cute little Vanilla Shortbread Butterflies that I 
made today! You may remember the Vanilla Shortbread 
Bunnies that I made last year. It's a wonderful recipe that
I make over and over. It's definitely one of my favorite
go to shortbread recipes!

The dough is easy to roll out and doesn't require 
any chilling time.

It's easy to cut out.....

Bakes in just 15 minutes....

Perfect for any season or holiday - just pick your shape!


VANILLA SHORTBREAD
adapted from here

INGREDIENTS:

1 cup butter, room temperature
1 cup icing (powdered) sugar
2 1/4 cups all purpose flour
2 tablespoons pure vanilla (yes, tablespoons)

DIRECTIONS:

Preheat oven to 325F. In a stand mixer fitted with
a paddle attachment, cream the butter and icing
sugar on medium speed until light and fluffy. 
Scrape down the sides of the bowl.

Turn the mixer to low and add the flour and mix 
until just combined. Scrape down the sides of the
bowl. Add the vanilla and mix to combine.

Place the dough on a lightly floured work surface.
Use a ruling pin to roll out the dough to about 1/4
inch thick. Use a cookie cutter of your choice to cut
out as many cookies as you can from the dough.
 Carefully transfer to a parchment lined
cookie sheet and place about 1/2" apart.

Bake in the preheated oven for 15 minutes or 
until the cookies are lightly golden brown around
the edges.  Remove from the oven. Transfer to 
wire racks to cool.


Enjoy!! ❤️👩‍🍳